I'll have 2 custom Skully's in the custom mini Skully show at Chuckwa in Fullerton CA. Over 90 artists took a whack at making this cool little piece their own.
"There's Something In My Eye" #1 and #2 will be available at the show, opening May 16th! I'm really into rusting up toys lately.
Saturday, April 25, 2009
Monday, April 20, 2009
THE SHADOWS KNOW!
Another aspect of the smoothing technique, using light and shadow to reveal tiny details.
I'm again using the old YHWY sculpt for a demo. Usually you will use his method when you have reached the final smoothing stages, at the finishing point.
Saturday, April 18, 2009
THE SMOOTHING TECHNIQUE!
I was looking for any good coverage I might have of the smoothing technique that I talk about. That is one of the number one things I am asked about when it comes to sculpting.
My good friend Don Asher helped me out by shooting this short video. The YHWY sculpt still exists. It's kind'a beat up, but was in great shape to do a little demo. I keep almost all of the sculpts that I make for vinyl. Unless they are completely destroyed by the molding process.
Tuesday, April 14, 2009
WHAT ABOUT THE BODY!
The roughing out of the body, legs and arms. The figure has to balance on it’s own before the sculpt can move forward. The foot positioning was going to be the solid foundation for the figure. I arranged it so the right foot was flat and the left foot toe made contact with the ground to form a solid triangular base.
The legs and butt form a flat table top for the body to rest. The bell shape of the dress is solid in the interior and has a flat level surface. You can see a line on the forehead this is to center the head body and legs. When the sculpt is converted to vinyl there’s no way to control any shifts the material will make over time. Figuring out which parts will be rotocast “Hollow Vinyl” or injection Solid plastic. Any part that bears weight will usually be injection plastic.
Tiny arms tiny hands. Check out the previous post where I go over how to set up the armature wire with thread: http://davepresslersculpting.blogspot.com/2007/11/sculpting-arms.html Getting the tiny fingers with finger nails is going to take allot of freeze spray and a magnifying glass.
The rough arm and hand taking shape. I ran into a piece of armature wire (I hate that!) It got buzzed down with a dremmel tool.
Checking that the arms are the same size. And the pose matches the original panting as closely as possible.
My work space in 2006. Hmmm cluttery!

Thursday, April 9, 2009
THE HEAD THE FACE THE EYES!
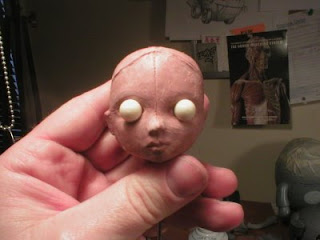
As the face was coming together it was time to insert the eyes. It’s necessary to have a full hard plastic half sphere the eyeball remains consistent.
Hey it’s children of the damned! This is the initial positioning of the eyes. The orbs will be the perfect size when they are set back in the head. All of Mark’s girls have very large saucer eyes. Also you notice there is line etched in the center of the face. At this point it’s important to define where the center of the face is.
After gouging out a socket for the eye, I started to rough out the lids and brow ridge.
This is the part where it takes the most concentration. To keep smoothing, comparing to the art and getting the face just right. At this stage I use smaller loop tools. It’s almost like doing cross hatching on a sketch, removing very little clay.
Having a small mirror helps to make sculpting the symmetry and ears easier.
Study the mirror view and copy it.
The mouth was not working out. Mark and I had some conversations about the mouth being cuter and more full. Sometimes for me the easiest thing is to wipe the slate clean and start fresh with a new idea. Never be to precious with your sculpts! Always be ready to slice off a nose or chop the mouth off. It feels like “Oh my god, but I put so much work into that!” If it’s not working it’s just in the way. Besides doing it a second time is always faster, you already did it once.
The new mouth was based on another of Mark’s sketches. More full “Sexy Innocence” if you will.
Again with the freeze spray. Once the shape is right I want to start tightening the detail. The circuit freeze is again my best friend. Freeze up the clay and sculpt it while it is rigid. Repeat as necessary.
Another good technique for attaining symmetry, turn the sculpt upside down. The new perspective will reveal areas to address.
Wednesday, April 8, 2009
WHAT ABOUT THE EARS AND THE GIRL!
When I’m working on a sculpt I want to get the entire piece roughed out. That way I can just see the entire form at once and make adjustments. The ears were going to be interesting. Not only do they have a fur texture, but some amazing folds that I wanted to really get to look right. It the same process adding hot clay to an armature, getting the rough form, then using finer tools to smooth and refine the shape.
The delicate fur texture I’ll make with a small tool. A simple etched line repeated over and over until it feels like your hand may fall off. At that point I was almost finished.
After the first pass of fur texture the clay gets brushed down with 91% Alcohol then I’ll etch the texture again. Doing several layers like this will give a richness to the overall fur texture. With vinyl it is always better to go a little deeper with the details. Details can get toned down in the process of manufacturing.
In this picture early on there fur on the outside of the ear too. Mark thought it would look better if the outer ear was smooth to contrast with the texture on the inside. This was a good note.
The outside is smoothed, it’s time to get the position on the head right. The ears had about 2 inches of armature wire sticking out so it was easy to just stab them in and play with the pose. Once the pose looked right then I added the clay, and sculpted the parts that would join them smoothly to the body.
At this stage I had done much smoothing and refining of the body and eyelids. The smoothing technique is what I get asked about the most. It’s mostly just taking a flat tool, working the clay into the rough curves and shapes, then using a large rake to take down the sculpt to smoother plains and slowly graduating to finer and finer rakes.
When it’s time to start working the final smoothing these are your best friends.
A mini torch, 91% Isopropyl Alcohol and circuit freeze spray. The first step I’ll take alcohol on a sea sponge (I like these better then the artificial sponges) rub down the clay with the sponge and smooth it out. Next fire up the torch, (Put the cap back on the alcohol and move it away. A couple times in a concentrated work frenzy I have set a lit torch down flame pointing to an open alcohol bottle) Hold the torch about 5 inches away from the clay until the surface gets nice and shinny. The blast it with the circuit freeze.
Repeat. I’ll have more smoothing as we go through the project.
I’ll return the YHWY but we must start the girl. As I said the girl was going to be challenging. Mark has mastered a very specialized female characterization of his female subjects. Capturing the subtleties was going to be hard.
The additional challenge is only having the semi 3/4 art to work with. The first step foil ball with armature wire. There are many ways to make the armature, some sculptors prefer a ball of wire. I like my foil. Next step to just get the very crude building blocks of the head and face in place.
See it looks just like the art! Next step, to just start measuring the head and face to create the rough land marks of where the features will live. In marks art I thought the eyes were a good feature to use as the measuring standard. How many eyes wide is the head? How many eyes tall is the forehead? Etc.
Many hours later the very rough face and head with basic facial geography is taking shape.
Also just looking at the art in the same angle and seeing if it looks right.
The other aspect of figuring out the girl is how will she fit together. She has a very specific pose in Mark’s painting. There was talk early on about changing her position so the vinyl would have better balance. I believe the vinyl should be a replica of the painting as much as possible. I was determined to work out a way for the girl to stand firm even with one foot up on the toes.
The delicate fur texture I’ll make with a small tool. A simple etched line repeated over and over until it feels like your hand may fall off. At that point I was almost finished.
After the first pass of fur texture the clay gets brushed down with 91% Alcohol then I’ll etch the texture again. Doing several layers like this will give a richness to the overall fur texture. With vinyl it is always better to go a little deeper with the details. Details can get toned down in the process of manufacturing.
In this picture early on there fur on the outside of the ear too. Mark thought it would look better if the outer ear was smooth to contrast with the texture on the inside. This was a good note.
The outside is smoothed, it’s time to get the position on the head right. The ears had about 2 inches of armature wire sticking out so it was easy to just stab them in and play with the pose. Once the pose looked right then I added the clay, and sculpted the parts that would join them smoothly to the body.
At this stage I had done much smoothing and refining of the body and eyelids. The smoothing technique is what I get asked about the most. It’s mostly just taking a flat tool, working the clay into the rough curves and shapes, then using a large rake to take down the sculpt to smoother plains and slowly graduating to finer and finer rakes.
When it’s time to start working the final smoothing these are your best friends.
A mini torch, 91% Isopropyl Alcohol and circuit freeze spray. The first step I’ll take alcohol on a sea sponge (I like these better then the artificial sponges) rub down the clay with the sponge and smooth it out. Next fire up the torch, (Put the cap back on the alcohol and move it away. A couple times in a concentrated work frenzy I have set a lit torch down flame pointing to an open alcohol bottle) Hold the torch about 5 inches away from the clay until the surface gets nice and shinny. The blast it with the circuit freeze.
Repeat. I’ll have more smoothing as we go through the project.
I’ll return the YHWY but we must start the girl. As I said the girl was going to be challenging. Mark has mastered a very specialized female characterization of his female subjects. Capturing the subtleties was going to be hard.
The additional challenge is only having the semi 3/4 art to work with. The first step foil ball with armature wire. There are many ways to make the armature, some sculptors prefer a ball of wire. I like my foil. Next step to just get the very crude building blocks of the head and face in place.
See it looks just like the art! Next step, to just start measuring the head and face to create the rough land marks of where the features will live. In marks art I thought the eyes were a good feature to use as the measuring standard. How many eyes wide is the head? How many eyes tall is the forehead? Etc.
Many hours later the very rough face and head with basic facial geography is taking shape.
Also just looking at the art in the same angle and seeing if it looks right.
The other aspect of figuring out the girl is how will she fit together. She has a very specific pose in Mark’s painting. There was talk early on about changing her position so the vinyl would have better balance. I believe the vinyl should be a replica of the painting as much as possible. I was determined to work out a way for the girl to stand firm even with one foot up on the toes.
Tuesday, April 7, 2009
LEVEL NO. 36!
Swedish game magazine LEVEL no. 36 has a nice little piece on my custom NES Advantage joystick I created for the "I Am 8Bit show" in 07. Thomas Sol Sunhede from Level no. 36 sent me a scan of the page.
Here is the article translation:
"This is not an copy like the rest but rather a nice "development" of the original. This piece was shown at the exhibition I am 8-bit in Los Angeles. With it's $700 price it is probably the most expensive of all NES advantage versions and it sure makes you want to take out the paint bucket again. LEVEL now wonders when the first Swedish joystick remake will pop up on Tradera (our Ebay). This writer has already sold a pink SEGA Saturn and a black Amiga but without any great profit. You'll find more funny art at davepresslerart.com."
THE IDIOT BOX!
The Idiot Box show at gallery 1988! Check it out if you get a chance. The piece I created: "Unemployed Kids Show Characters" Brainy The Smoking Dog, Kevin The Drunken Furry Frankfurter and Formerly One Eyed Carl.
Monday, April 6, 2009
WHAT’S THE BACK LOOK LIKE?!
That was my question! Although many of the answers were evident by following the contours of the front. The shadowing in the painting were also good roadmaps of the overall form. Subtlety was the key. The figure has such a delicate organic feel yet very specific anatomy. The next big step was to measure the thickness of the piece at various points to make sure it was accurate to the picture.
I used my cable rake to start removing and smoothing the rough form. As well as raking down bumps I’m also looking to fill in divots and depressions.
The accuracy of the anatomy will become very important when it comes time to place the eyes and ears. Through measuring the height and thickness the rest falls into place. At this stage the form still had to become more round and smooth.
Etching lines into the various points I have chosen will keep it accurate. For instance the highlight on the forehead is probably the thickest point, tapering down to the first eye as the thiner area. As always my ideas of how it will look are alway checked with Mark to keep me on the right track.
Now finding some areas the need clay added.
Adding, subtracting and more smoothing with the cable rake.
Now it’s really taking shape. My work table is alway cluttered with various projects. I see a Robot Pirate and the beginnings of the Gas Powered Dragon.
Eye positioning. Since it has to be manufactured I have to make sure a standard size acrylic half sphere can fit. Also I want them to look relaxed, not bulgy of to sunken in.
Also the delicate folds of the eyelids. It’s all about laying up the clay rough then working it down into the right shape. Also
As you can see I try to line up the eye with the relative horizontal and vertical marks on the art. It may not be exactly in the same spot, but sculpting isn’t like building a rocket ship. (Unless you are sculpting precision machine parts) This is just a teqnuqie for problem solving. If I were to get further along on the sculpt and the eye positions, or the form proportions looked all wrong I could always go back to my size sheet (The Art) and double check the measurements to help fix it. Also once everything is in the right place then it frees you up to be more artistic and work on character.
Next, what about the girl? And the ears?
LONDON MILES GALLERY!
THE YWH SCULPT!
Way back in 2006 Long Gone John of Necessaries Toy Foundation called me about a special project. I had sculpted the Camille’s Girls series for John and the yet to be released Sunday Girls by Fawn Gehweiler. So not only did I like working with John, I also considered him a friend. He told me this was to be a BIG TOP SECRET toy project. Hmmm so mysterious! He had been talking with Mark Ryden for some time about a vinyl art figure. I was all at once excited and a bit intimidated to be sculpting the first ( and maybe only ) Mark Ryden vinyl figure. Mark had chosen the YHWH painting (Or his son had) to be the first toy. Sculpting the girl seemed like it was going to be the trickiest part. Considering that Mark has made his female creations such a specific and amazing element to his work, and the human for is not my specialty.
After studying the painting, and getting the size specifics. I scanned the image and enlarged the print to the height of the “rabbit totem” knowing that the girl would follow in proper proportion. There had to be complete accuracy with every curve so starting the sculpt actually on the picture of the art was a great way to get the basic shape. Also the eye position was going to be a key element. The eyes in the painting are so alive and focused, that the eye line of the vinyl had to have the same intensity. I suggested to John that the final piece should have realistic plastic eyes if the budget would permit.
Balance! I had to make sure this thing was not going to topple over. If the final figure has to stand a certain way, the sculpt should do the exact same. Making this piece out of solid clay would betray the structure of the finished vinyl piece. It would end up being a hollow rotocast vinyl piece with some weights at the bottom for balance. Making the core out of aluminum foil wrapped around an armature wire with some weights at the bottom would be the way to make the sculpt.
In the beginning there was the core. A single length of armature wire with foil.
The next step was to start getting the clay on the armature. Those of you who have followed my step by steps in the past may have seen this next method before: May 2007. Let’s go through it one more time! I like to us sulphur free NSP Chavant Clay “Hard”. Put it in a microwavable container let it go until it’s like pudding. Then spread the hot clay on the armature like frosting a cake.
Get the whole thing coated and the basic form roughed out.
Once the entire foil form is coated there is a solid base to sculpt on.
As the mass builds up use a flat tool to plain down all the rough surfaces.
After adding clay and plaining into shape the rough for starts to appear. Notice there is one pencil mark on the right side indicated a particular curve. The manufacturer was concerned that this curve came out too far and would make it difficult to pull the vinyl pieces from the mold. the curve had to be taken in without changing the shape of the character too drastically
The basic form is now roughed out. The next challenging step will be eye placement, and creating the flow of three dimensional curves using the two dimensional art that I have. Also what is the back going to look like? This is where the skills of interpretation come in. Mark was far to busy to do turn around art to show me he vision for all sides of the piece. This frequently happens where I will have one piece of art to use for the sculpt and must interpret the rest. That is what I will get into in the next step.
Subscribe to:
Posts (Atom)